Gradio 工具
一、基础概念
Gradio允许用户使用Python为任何机器学习模型构建、自定义、共享web-based演示(demo)。安装:
pip install gradio。简单用法:
import gradio as grdef greet(name):return "Hello " + namedemo = gr.Interface(fn=greet, inputs="text", outputs="text")demo.launch()# 或者也可以直接实例化一个文本框# textbox = gr.Textbox(label="Type your name here:", placeholder="John Doe", lines=2)# gr.Interface(fn=greet, inputs=textbox, outputs="text").launch()
launch方法:默认情况下,launch()方法将在Web server中启动演示并在本地运行。 如果你在Jupyter或Colab notebook中运行代码,那么Gradio会将演示GUI嵌入到notebook中。也可以通过不同的参数自定义launch()的行为:inline:是否在Python notebook中内嵌地展示interface。inbrowser:是否在默认浏览器中自动地打开一个新tab并launch interface。share:是否为interface从你的电脑上创建一个公开可分享的链接。
包含预测模型:首先,我们定义一个接受文本提示并返回文本完成的预测函数:
xxxxxxxxxxfrom transformers import pipelinemodel = pipeline("text-generation")def predict(prompt):completion = model(prompt)[0]["generated_text"]return completion然后我们创建和启动一个接口:
xxxxxxxxxximport gradio as grgr.Interface(fn=predict, inputs="text", outputs="text").launch()Interface类:Interface类有3个必需参数:xxxxxxxxxxInterface(fn, inputs, outputs, ...)其中:
fn:由Gradio接口包装的预测函数。 该函数可以接受一个或多个参数并返回一个或多个值。inputs:输入组件类型。Gradio提供了许多预构建的组件,例如"image"或"mic"。outputs:输出组件类型。 同样,Gradio提供了许多预构建的组件。
有关组件的完整列表,请参考
https://gradio.app/docs。 每个预构建的组件都可以通过实例化该组件对应的类来定制。为了给演示添加额外的内容,
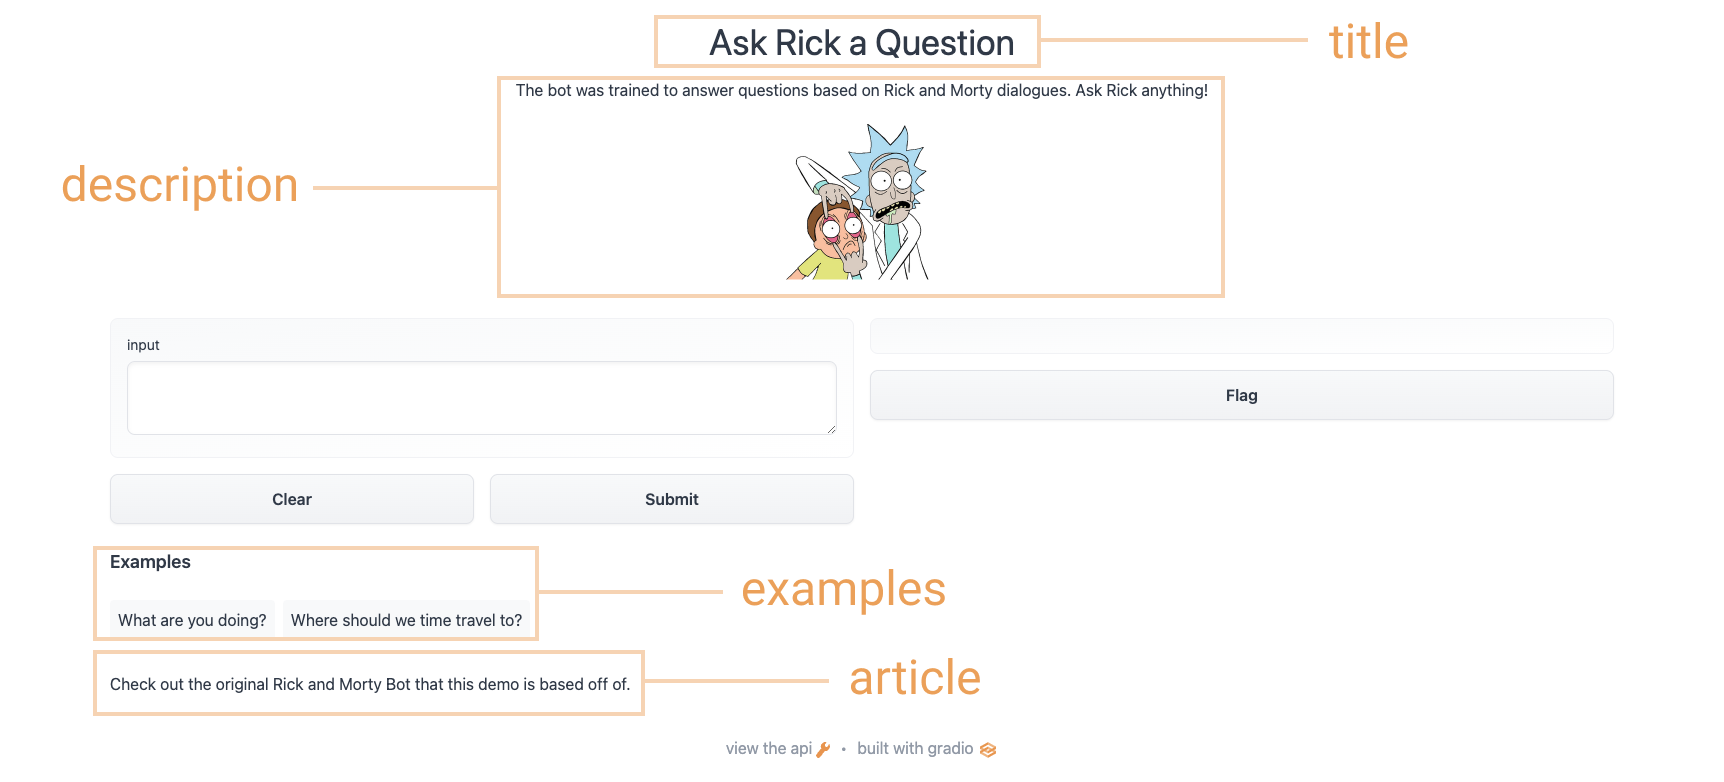
Interface类支持一些可选参数:title:演示标题,它出现在输入组件和输出组件的上方。description:界面描述(文本、Markdown或HTML),显示在输入组件和输出组件的上方、标题下方。article:扩展文章(文本、Markdown或HTML)用于解释界面。如果提供,它会出现在输入组件和输出组件的下方。theme:界面主题。可以为default, huggingface, grass, peach等之一。也可以添加dark-前缀从而得到深色主题。examples:可以为函数提供一些示例的输入。它们可以出现在UI组件下方。live:如果live=True,那么每次当输入更改时,模型都会重新运行。
例如:
xxxxxxxxxxtitle = "Ask Rick a Question"description = """The bot was trained to answer questions based on Rick and Morty dialogues. Ask Rick anything!<img src="https://huggingface.co/spaces/course-demos/Rick_and_Morty_QA/resolve/main/rick.png" width=200px>"""article = "Check out [the original Rick and Morty Bot](https://huggingface.co/spaces/kingabzpro/Rick_and_Morty_Bot) that this demo is based off of."gr.Interface(fn=predict,inputs="textbox",outputs="text",title=title,description=description,article=article,examples=[["What are you doing?"], ["Where should we time travel to?"]],).launch()
处理多个输入和多个输出:
xxxxxxxxxximport numpy as npimport gradio as grnotes = ["C", "C#", "D", "D#", "E", "F", "F#", "G", "G#", "A", "A#", "B"]def generate_tone(note, octave, duration):sr = 48000a4_freq, tones_from_a4 = 440, 12 * (octave - 4) + (note - 9)frequency = a4_freq * 2 ** (tones_from_a4 / 12)duration = int(duration)audio = np.linspace(0, duration, duration * sr)audio = (20000 * np.sin(audio * (2 * np.pi * frequency))).astype(np.int16)return (sr, audio)gr.Interface(generate_tone,[ # 多个输入gr.Dropdown(notes, type="index"), # 一个下拉菜单gr.Slider(minimum=4, maximum=6, step=1), # 一个滑块gr.Textbox(type="text", value=1, label="Duration in seconds"), # 一个文本框],"audio", # 一个输出).launch()分享:有两种方式可以分享你的演示:
临时分享:通过在
launch()方法中设置share=True来实现:xxxxxxxxxxgr.Interface(classify_image, "image", "label").launch(share=True)这会生成一个公开的、可分享的链接。其它用户可以在该用户的浏览器中使用你的模型长达
72个小时。所有模型计算都发生在你的设备上。注意,由于这些链接是公开可访问的,这意味着任何人都可以用你的模型进行预测。如果设置
share=False(默认行为),则仅创建本地链接。在
Hugging Face Spaces上托管(永久分享):Hugging Face Spaces提供了在互联网上永久地、免费地托管Gradio模型的基础设施。
与
Hugging Face Hub集成:Gradio可以直接与Hugging Face Hub和Hugging Face Spaces集成,仅用一行代码从Hub和Space加载演示。xxxxxxxxxximport gradio as grtitle = "GPT-J-6B"description = "Gradio Demo for GPT-J 6B, a transformer model trained using Ben Wang's Mesh Transformer JAX. 'GPT-J' refers to the class of model, while '6B' represents the number of trainable parameters. To use it, simply add your text, or click one of the examples to load them. Read more at the links below."article = "<p style='text-align: center'><a href='https://github.com/kingoflolz/mesh-transformer-jax' target='_blank'>GPT-J-6B: A 6 Billion Parameter Autoregressive Language Model</a></p>"examples = [["The tower is 324 metres (1,063 ft) tall,"],["The Moon's orbit around Earth has"],["The smooth Borealis basin in the Northern Hemisphere covers 40%"],]gr.Interface.load("huggingface/EleutherAI/gpt-j-6B", # 从 HuggingFace Hub 加载# "spaces/abidlabs/remove-bg", # 从 HuggingFace Space 加载inputs=gr.Textbox(lines=5, label="Input Text"),title=title,description=description,article=article,examples=examples,enable_queue=True,).launch()
二、高级功能
使用状态保存数据:
Gradio支持 ”会话状态“,其中数据在页面加载中的多次提交中持续存在。会话状态对于构建演示很有用,例如,聊天机器人需要保留历史会话数据。请注意, 会话状态不会在模型的不同用户之间共享数据。要将数据存储在会话状态中,你需要做三件事:
向函数中传递一个额外的参数,该参数表示
Interface的状态。
在函数结束时, 将状态的更新后的值以额外的返回值来返回
在创建
Interface时添加state input组件和state output组件。
例如下面的聊天机器人的例子:
xxxxxxxxxximport randomimport gradio as grdef chat(message, history): # history 存储 Interface 的状态history = history or []if message.startswith("How many"):response = random.randint(1, 10)elif message.startswith("How"):response = random.choice(["Great", "Good", "Okay", "Bad"])elif message.startswith("Where"):response = random.choice(["Here", "There", "Somewhere"])else:response = "I don't know"history.append((message, response))return history, history # history 作为额外的返回值iface = gr.Interface(chat,["text", "state"],["chatbot", "state"],allow_screenshot=False,allow_flagging="never",)iface.launch()注意:可以给
state参数(即,history变量)传入一个默认值,作为state的初始值。为输出结果提供解释:大多数机器学习模型都是黑盒子,函数的内部逻辑对终端用户是隐藏的。为了提高透明度,我们通过简单地将
Interface类中的interpretation关键字设置为默认值,使得向模型添加解释变得非常容易。这允许你的用户理解输入的哪些部分负责输出。示例:
xxxxxxxxxximport requestsimport tensorflow as tfimport gradio as grinception_net = tf.keras.applications.MobileNetV2() # load the model# Download human-readable labels for ImageNet.response = requests.get("https://git.io/JJkYN")labels = response.text.split("\n")def classify_image(inp):inp = inp.reshape((-1, 224, 224, 3))inp = tf.keras.applications.mobilenet_v2.preprocess_input(inp)prediction = inception_net.predict(inp).flatten()return {labels[i]: float(prediction[i]) for i in range(1000)}image = gr.Image(shape=(224, 224))label = gr.Label(num_top_classes=3)title = "Gradio Image Classifiction + Interpretation Example"gr.Interface(fn=classify_image, inputs=image, outputs=label, interpretation="default", title=title).launch()通过提交一个输入,然后单击输出组件下的
Interpret来测试解释功能。除了
Gradio提供的default解释方法之外,你还可以为interpretation参数指定shap,并设置num_shap参数。这使用基于Shapley的解释。最后,还可以将自己的解释函数传入interpretation参数。Blocks:Blocks是底层的API,它和Interface的区别在于:Interface:高级API,让你只需提供input和output组件,即可创建完整的机器学习演示。Block:低级API,它允许你完全控制你的应用程序的数据流和布局。
为什么要用
Block?虽然Interface API非常易于使用,但是缺乏Blocks API提供的灵活性。例如:将一组演示整合成
web application中的多个选项卡。更改
demo的布局,例如,指定input组件和output组件的位置。具有
multi-step的接口,其中一个模型的输出作为下一个模型的输入,或者通常具有更灵活的数据流。根据用户输入来调整组件的属性(如下拉列表的选项)、或可见性。
简单的示例:
xxxxxxxxxximport gradio as grdef flip_text(x):return x[::-1]demo = gr.Blocks()with demo:gr.Markdown("""# Flip Text!Start typing below to see the output.""")input = gr.Textbox(placeholder="Flip this text")output = gr.Textbox()input.change(fn=flip_text, inputs=input, outputs=output) # input 的 change 事件触发器demo.launch()上述简单示例介绍了
block的4个基本概念:block允许你允许你构建结合了markdown、HTML、button、以及交互组件的web应用程序,只需实例化这些组件。实例化组件的顺序很重要,因为每个元素都按照创建的顺序呈现到
web应用程序中。更复杂的布局将在接下来讨论。你可以在代码中的任何位置定义常规
Python函数, 并使用block在用户输入的情况下运行它们。如示例中的flip_text函数。你可以编写任何Python函数, 从简单的计算到处理机器学习模型预测。你可以将事件指定给任何
block组件。这将在组件被单击、被修改等情况下运行函数。当你分配一个事件时,你传入三个参数:fn:事件发生时,应该被调用的函数。inputs:被调用的输入组件(及其列表)outputs:被调用的输出组件(及其列表)
在上面的示例中,当名为
input的Textbox中的值发生变化时,我们运行flip_text()函数。该事件读取input组件中的值,将其作为参数传递给flip_text(),然后该函数返回一个值从而被传递给名为output的Textbox。block会根据你定义的事件触发器自动确定组件是否应该是交互式的(接受用户输入)。在我们的示例中:第一个文本框是交互式的,因为它的值由
flip_text()函数使用。第二个文本框不是交互式的,因为它的值从不用作输入。
在某些情况下,你可能想要覆盖它。此时,你可以通过传递一个布尔值给组件的
interactive参数。例如gr.Textbox(placeholder="Flip this text", interactive=True)。
自定义布局:默认情况下,
block在单列中垂直呈现创建的组件。你可以通过使用with gradio.Column():创建其他列或使用with gradio.Row():创建其他行,从而在这些上下文中创建组件来改变这一点。注意:在Column下创建的任何组件都将垂直布局(这也是默认设置);在Row下创建的任何组件都将水平布局。最后,你还可以使用
with gradio.Tabs()上下文管理器为你的demo创建选项卡。在此上下文中,你可以通过使用gradio.TabItem(name_of_tab):指定来创建选项卡的多个选项。在gradio.TabItem(name_of_tab):中创建的任何组件都会出现在该选项卡中。示例:
xxxxxxxxxximport numpy as npimport gradio as grdemo = gr.Blocks()def flip_text(x):return x[::-1]def flip_image(x):return np.fliplr(x)with demo:gr.Markdown("Flip text or image files using this demo.") # 一个 Markdown 组件with gr.Tabs(): # 一个选项卡with gr.TabItem("Flip Text"):with gr.Row(): # 一行text_input = gr.Textbox()text_output = gr.Textbox()text_button = gr.Button("Flip")with gr.TabItem("Flip Image"):with gr.Row():image_input = gr.Image()image_output = gr.Image()image_button = gr.Button("Flip")text_button.click(flip_text, inputs=text_input, outputs=text_output)image_button.click(flip_image, inputs=image_input, outputs=image_output)demo.launch()探索事件和状态:正如你可以控制布局一样,
block可以让你对触发函数调用的事件进行细粒度控制。每个组件和许多布局都有它们支持的特定事件。例如。Textbox组件有两个事件:change():当文本框内的值发生变化时,该事件发生。submit():当用户焦点在文本框时且按下enter键,则该事件发生。
更复杂的组件可以有更多的事件。例如,
Audio组件也有单独的事件,用于播放、清除、暂停音频文件等。你可以将事件触发器附加到这些事件中的一个或多个。你可以通过在组件实例中调用事件名称作为函数来创建一个事件触发器。例如
textbox.change(...)或btn.click(...)。如前所述, 该函数接受三个参数:fn:当该事件发生时需要回调的函数。inputs:组件(及其列表), 其值应作为fn函数的输入参数提供。每个组件的值按顺序映射到相应的函数参数。如果fn函数不带任何参数,则此参数可以为None。outputs:应根据函数返回的值更新其值的组件(及其列表)。每个返回值按顺序设置相应组件的值。如果fn函数不返回任何内容,则此参数可以为None。
你甚至可以使输入和输出组件成为同一个组件,如:
xxxxxxxxxximport gradio as grapi = gr.Interface.load("huggingface/EleutherAI/gpt-j-6B")def complete_with_gpt(text):# Use the last 50 characters of the text as contextreturn text[:-50] + api(text[-50:])with gr.Blocks() as demo:textbox = gr.Textbox(placeholder="Type here and press enter...", lines=4)btn = gr.Button("Generate")btn.click(complete_with_gpt, textbox, textbox)demo.launch()创建多步骤的演示:在某些情况下, 您可能需要一个多步骤的演示,其中复用一个函数的输出作为下一个函数的输入。使用
block很容易做到这一点,因为你可以使用某个组件作为一个事件触发器的输入,但作为另一个事件触发器的输出。例如:一个文本组件,它的值是语音到文本模型的结果,但也被传递到情感分析模型中:
xxxxxxxxxxfrom transformers import pipelineimport gradio as grasr = pipeline("automatic-speech-recognition", "facebook/wav2vec2-base-960h")classifier = pipeline("text-classification")def speech_to_text(speech):text = asr(speech)["text"]return textdef text_to_sentiment(text):return classifier(text)[0]["label"]demo = gr.Blocks()with demo:audio_file = gr.Audio(type="filepath")text = gr.Textbox()label = gr.Label()b1 = gr.Button("Recognize Speech")b2 = gr.Button("Classify Sentiment")b1.click(speech_to_text, inputs=audio_file, outputs=text)b2.click(text_to_sentiment, inputs=text, outputs=label)demo.launch()更新组件的属性:到目前为止,我们已经了解了如何创建事件来更新另一个组件的值。但是,如果你想更改组件的其他属性(例如文本框的可见性) ,那么你可以通过返回组件类的
update()方法而不是返回常规的返回值来做到这一点。示例:
import gradio as grdef change_textbox(choice):if choice == "short":return gr.Textbox.update(lines=2, visible=True)elif choice == "long":return gr.Textbox.update(lines=8, visible=True)else:return gr.Textbox.update(visible=False)with gr.Blocks() as block:radio = gr.Radio(["short", "long", "none"], label="What kind of essay would you like to write?")text = gr.Textbox(lines=2, interactive=True)radio.change(fn=change_textbox, inputs=radio, outputs=text)block.launch()
三、示例
音频示例:我们将使用
Audio组件作为输入。 使用Audio组件时,你可以指定希望音频的source是用户上传的文件、还是用户录制声音的麦克风。 在这个例子中,我们将其设置为麦克风。此外,我们希望将音频作为
numpy数组来接收,以便后续处理。 所以我们将"type"设置为"numpy",它会传递输入data作为(sample_rate, data)的元组进入我们的函数。我们还将使用
Audio输出组件,它可以自动将(sample_rate, data)元组渲染为可播放的音频文件。 在这种情况下,我们不需要进行任何自定义,因此我们将使用字符串快捷方式"audio"。xxxxxxxxxximport numpy as npimport gradio as grdef reverse_audio(audio):sr, data = audioreversed_audio = (sr, np.flipud(data))return reversed_audiomic = gr.Audio(source="microphone", type="numpy", label="Speak here...")gr.Interface(reverse_audio, mic, "audio").launch()语音识别:我们将使用
Transformers中的pipeline()函数加载我们的语音识别模型。接下来,我们将实现一个transcribe_audio()函数来处理音频并返回转录文本。 最后,我们将把这个函数包装在一个Interface中,其中Audio组件用于输入,只有文本用于输出。from transformers import pipelineimport gradio as grmodel = pipeline("automatic-speech-recognition")def transcribe_audio(mic=None, file=None):if mic is not None:audio = micelif file is not None:audio = fileelse:return "You must either provide a mic recording or a file"transcription = model(audio)["text"]return transcriptiongr.Interface(fn=transcribe_audio,inputs=[gr.Audio(source="microphone", type="filepath", optional=True),gr.Audio(source="upload", type="filepath", optional=True),],outputs="text",).launch()注意这里通过将
optional参数设为True,从而允许用户提供麦克风或音频文件(或两者都不提供,但这会返回错误消息)。